 Passenger & driver safety and security is at the core of every successful transit system operation. But when it comes time to cough up the money to upgrade camera equipment or add more camera views, it can often be difficult to secure funding. Many transit agencies find the need to justify their camera purchase with the powers that be. What many have found most useful is a return on investment (ROI) calculation that shows exactly what improvements and cost reductions can be achieved through investment in the latest security technology.
To justify your next transit security upgrade, we thought we’d share our step-by-step guide to calculating the ROI of transit surveillance.
Here are some of the steps we suggest you take to justify your next bus camera system purchase:
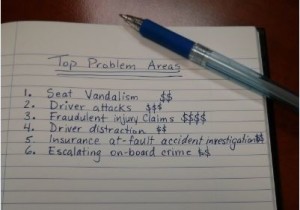
Step 1: Identify Your Problem Areas

One of the best places to start is by making a list of your problem areas, or in other words the biggest drains on your time and finances. For a lot of agencies this is fraudulent injury or accident claims. For others it might be vandalism such as graffiti or seat destruction, increasing crime rates, or driver assaults. Try to put together as comprehensive a list as possible, it may surprise you how a few small things can add up to make a big impact.
Step 2: Collect Data

The next step is to take the list you just created and collect the data required to establish your current costs, in order to create a baseline. It holds way more credibility if you use actual data (i.e. number of events or expenses and the average cost based on data from the past 3 years). For example, one transit agency we worked with had a significant amount of fraudulent claims and collected data on the number of claims per month, the average dollars paid out, the number of claims that went to litigation, and the amount of resources required to investigate claims. These numbers formed the basis of their ROI calculation.
Consult your risk management, legal, or human resources departments to collect this data. It helps to calculate the monthly costs in order to establish your payback period. You can be as detailed or as general as your agency allows or time permits.
Step 3: Set Goals & Objectives

Once you have collected your data, the next step is to set some realistic and feasible goals and outcomes from your purchase. Take the same data that you collected in step two and determine which of these costs can be reduced or eliminated with your camera system purchase.
Some of the most common goals are to reduce the number of fraudulent injury claims, reduce the hours required to investigate claims, reduce vandalism, and reduce absenteeism and medical costs from driver assaults.
From the ROI calculations we have been involved in it is not unexpected to see the number of fraudulent claims reduced by between 30 and 50% and the amount of time required to investigate those claims reduced from several days to under an hour.
Step 4: Do the Math
 Now that you have determined what factors will have an impact on security costs, collected historical data, and made some projections on what costs you can reduce or eliminate, it’s time to do the math.
First, tally up the costs before installing cameras and then subtract your projected costs after the cameras are installed to calculate your savings per month. Then, use the calculation below to determine your payback period:

Based on the calculations we’ve participated in with clients, this payback period typically ranges from 12 to 24 months.
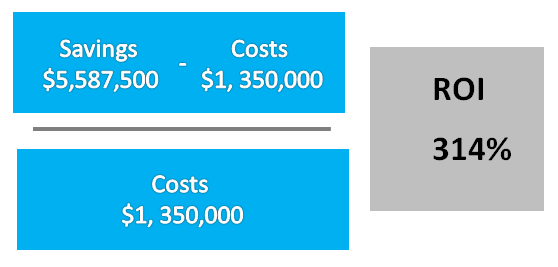
The next step is to take those numbers and calculate your ROI over the optimal operating period of a typical camera system, for example 5 years. Here is a sample calculation from one transit agency with 300 buses:

Following these 4 simple steps to calculate the ROI of transit security should help you justify your camera purchase and convince your decision committee that investing in improvements to transit security can actually yield a positive return on investment.


